> ## Documentation Index
> Fetch the complete documentation index at: https://docs.genow.ai/llms.txt
> Use this file to discover all available pages before exploring further.
# Knowledge Management: Add and Manage Knowledge
> Learn how to add knowledge to your Agent and manage existing assets and sources.
> **Knowledge is organised in two levels: Knowledge Sources hold the raw connection to a data system, and Knowledge Assets group those sources into packages that your team can access. Both are managed from the Agent's knowledge overview.**
***
## The Knowledge Overview
After opening an Agent in the admin panel, the knowledge overview is your central hub for managing all knowledge. It shows all Knowledge Assets with their connected sources, and provides all key actions in one place.
From here you can:
* Click + Add knowledge to create new assets and sources using a guided workflow
* Open any asset to view and manage its sources
* Share, edit, or delete existing assets
***
## Adding Knowledge: The Guided Workflow
Clicking + Add knowledge opens a step-by-step wizard. You choose between two paths:
* **Add new asset** - creates a brand-new asset, optionally with its first source
* **Add source to an existing asset** - connects a new source to an asset that already exists
Select whether you want to create a new asset or add a source to an existing one. If no assets exist yet, only "Add new asset" is available.
Enter a name and optional description for the new asset. You can also set whether the asset should be pre-selected by default when users open the Agent.
You can configure AI-based translations for the asset later in the asset settings.
Choose the data system you want to connect. Only connectors that are available for your Agent are shown. See the connector-specific setup details below.
You can skip this step to create an empty asset without any source. The asset will appear in the knowledge overview and you can add sources to it later.
Select the folders, files, or scope for your source, and optionally configure a recurring sync schedule.
* Click Save & Sync to save and immediately start a synchronization.
* Click Save to save the source without syncing right away.
Syncs cause costs (as of May 2026: \$10 per 1000 pages) and update the Agent's knowledge base. Make sure you have selected the correct scope before starting a sync.
After saving, the new asset appears immediately in the knowledge overview.
***
## Connector Setup Details & Start Synchronizations
Select your data system below for setup instructions:
### Preparation
* **Connect your SharePoint at the highest site level** (yourcompany.sharepoint.com/site/siteName) **with an SPN** you will receive from your company. **Your IT or internal contact person probably will be able to help you with that**. This allows the Genow platform to access your SharePoint Site.
* When setting up the SharePoint connector or creating sources, you will need the full site link on the highest level.
* Syncing new or updated documents is possible in the admin panel or via scheduled syncs.
### Create a New SharePoint Source:
1. Enter a **name** for your source - this will also be the name of the knowledge source. Make sure the name can be easily understood by you and your team during future visits.
2. **Service Connection:** Select your service connection. If nothing is displayed, contact your IT department. The service connection refers to the SPN connected to your SharePoint site.
3. **SharePoint Link: We will use the relevant part of your url and cut off the rest.** Minimum amount of information: *yourcompanyname.sharepoint.com/sites/SiteName*
Go to the next screen with Continue to select the scope of the data synchronization.
#### Selecting Your Scope
Select all relevant folders or loose documents using the Files batch on each side to synchronize information.
 #### File Type Selection
When configuring the scope of your SharePoint source, you can filter by file type to control which documents are synchronized. Only the selected file types will be included in the sync - all others are ignored. This allows you to keep your knowledge base focused and avoid syncing unnecessary files.
#### FAQ
* If you add subfolders of folders already selected for a synchronization, you do not have to change the content configuration. Only if you added folders that are not part of an already selected folder do you have to change the configuration.
* If you delete elements in SharePoint and then perform a synchronization, the deleted elements will also be unavailable on the Genow platform.
* SharePoint pages and lists can be selected either all or none. The selection is done at the highest level.
* Files over 500 MB will not be synchronized. If needed, we automatically convert files to PDFs and split them into several files. They will not be modified in your own file system.
* Make sure your documents meet the requirements in the [Data Maintenance](/use-case-management/knowledge/data-maintenance) article.
You can synchronize data from Google Drive either by using a service account or your personal access token. You can select from one of these options during the source creation step. This setting is managed by your IT department.
After creating the sync, you have the option to create a personal access token which uses your account to access your Google Drive permissions. Click on Create Credential or Refresh Credential to do this. A Google pop-up will open. Please follow the instructions and grant Genow access to read your Google Drive items.
After this process has been completed you will be brought back to the Genow platform tab in your browser and you can continue to select relevant data.
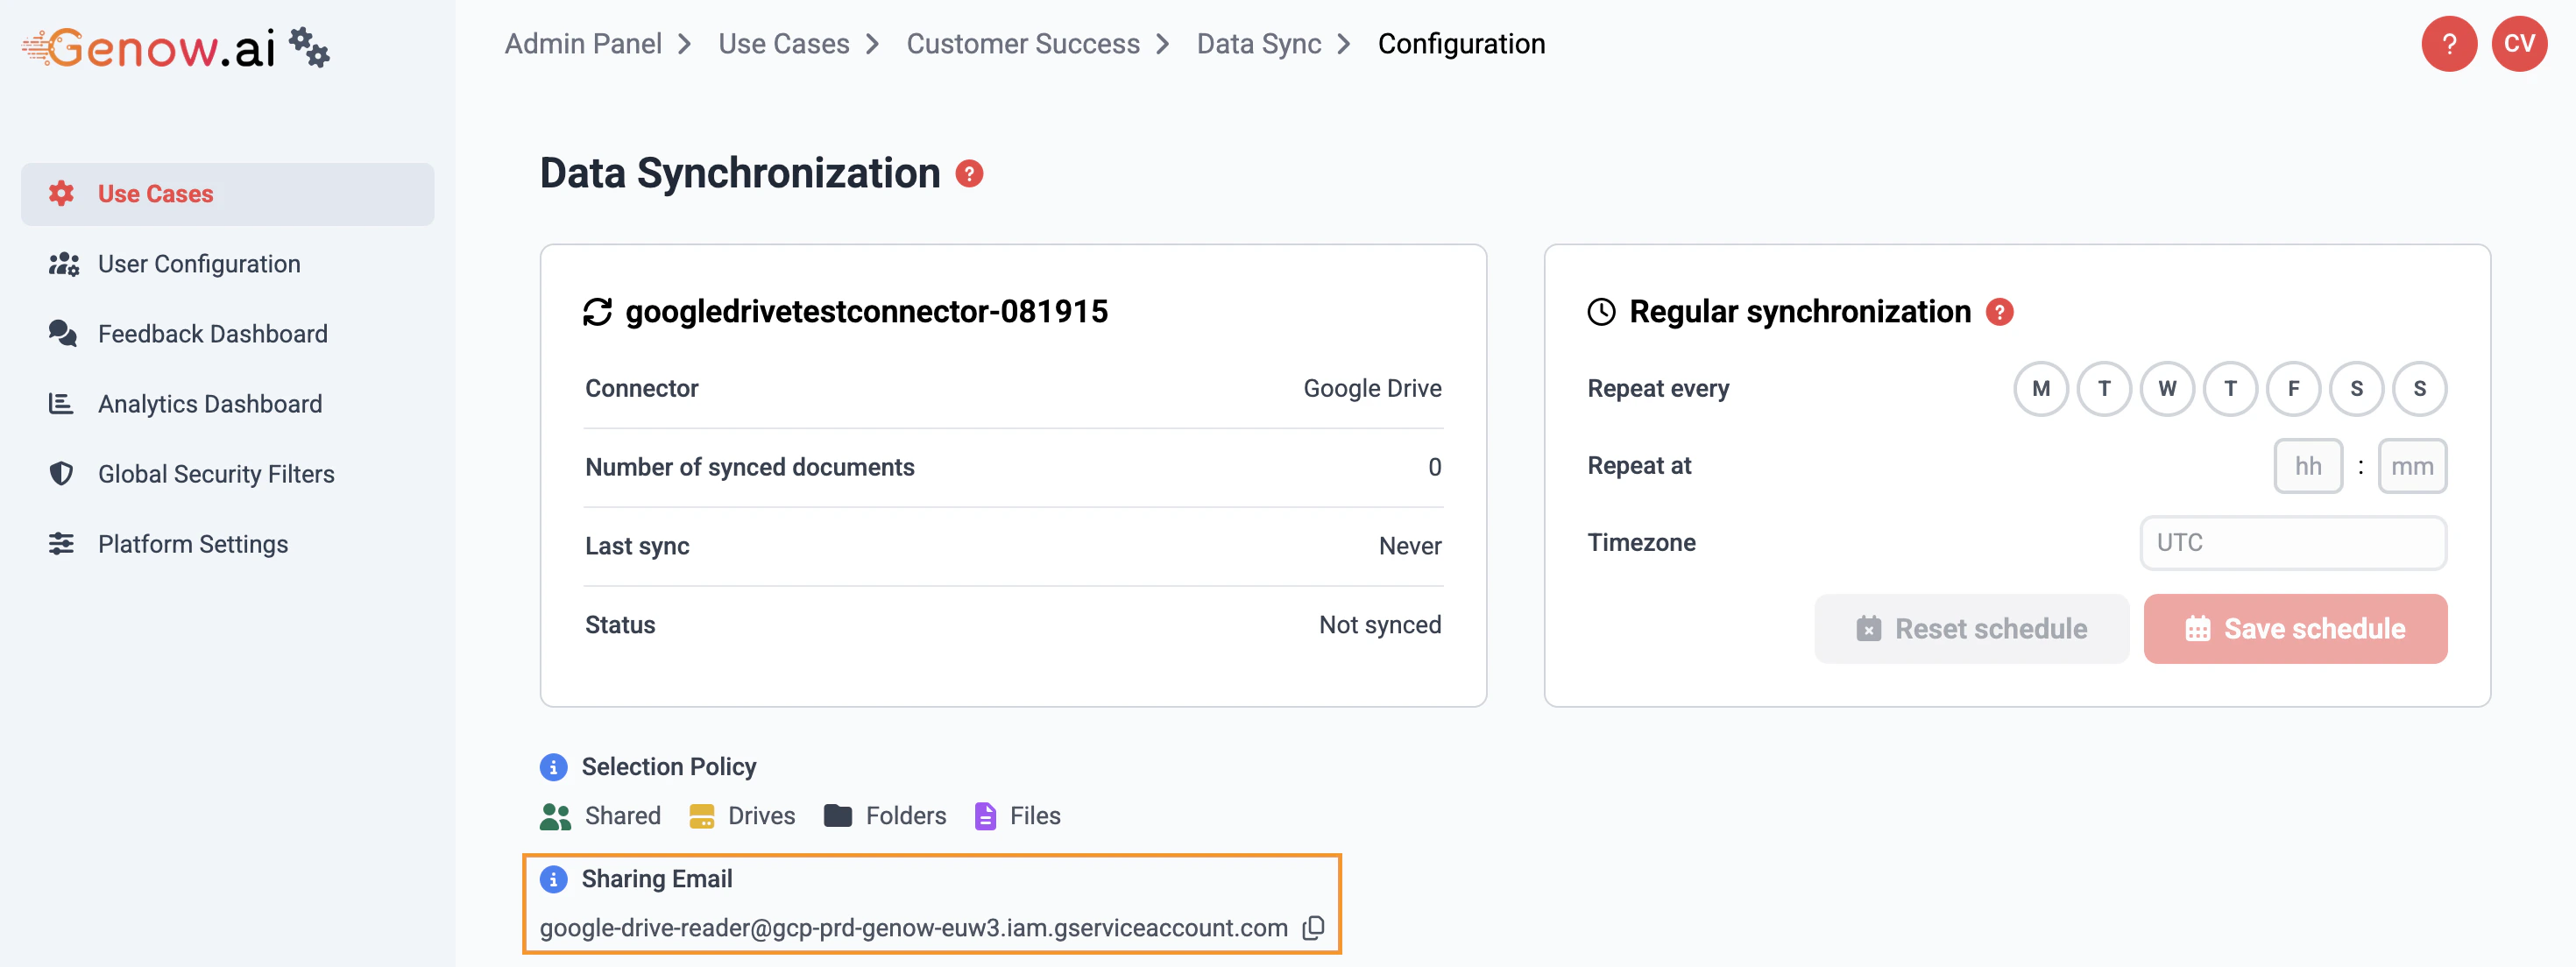
After creating the sync, an e-mail address is displayed under "Sharing Email". Copy this address to the clipboard.
#### File Type Selection
When configuring the scope of your SharePoint source, you can filter by file type to control which documents are synchronized. Only the selected file types will be included in the sync - all others are ignored. This allows you to keep your knowledge base focused and avoid syncing unnecessary files.
#### FAQ
* If you add subfolders of folders already selected for a synchronization, you do not have to change the content configuration. Only if you added folders that are not part of an already selected folder do you have to change the configuration.
* If you delete elements in SharePoint and then perform a synchronization, the deleted elements will also be unavailable on the Genow platform.
* SharePoint pages and lists can be selected either all or none. The selection is done at the highest level.
* Files over 500 MB will not be synchronized. If needed, we automatically convert files to PDFs and split them into several files. They will not be modified in your own file system.
* Make sure your documents meet the requirements in the [Data Maintenance](/use-case-management/knowledge/data-maintenance) article.
You can synchronize data from Google Drive either by using a service account or your personal access token. You can select from one of these options during the source creation step. This setting is managed by your IT department.
After creating the sync, you have the option to create a personal access token which uses your account to access your Google Drive permissions. Click on Create Credential or Refresh Credential to do this. A Google pop-up will open. Please follow the instructions and grant Genow access to read your Google Drive items.
After this process has been completed you will be brought back to the Genow platform tab in your browser and you can continue to select relevant data.
After creating the sync, an e-mail address is displayed under "Sharing Email". Copy this address to the clipboard.
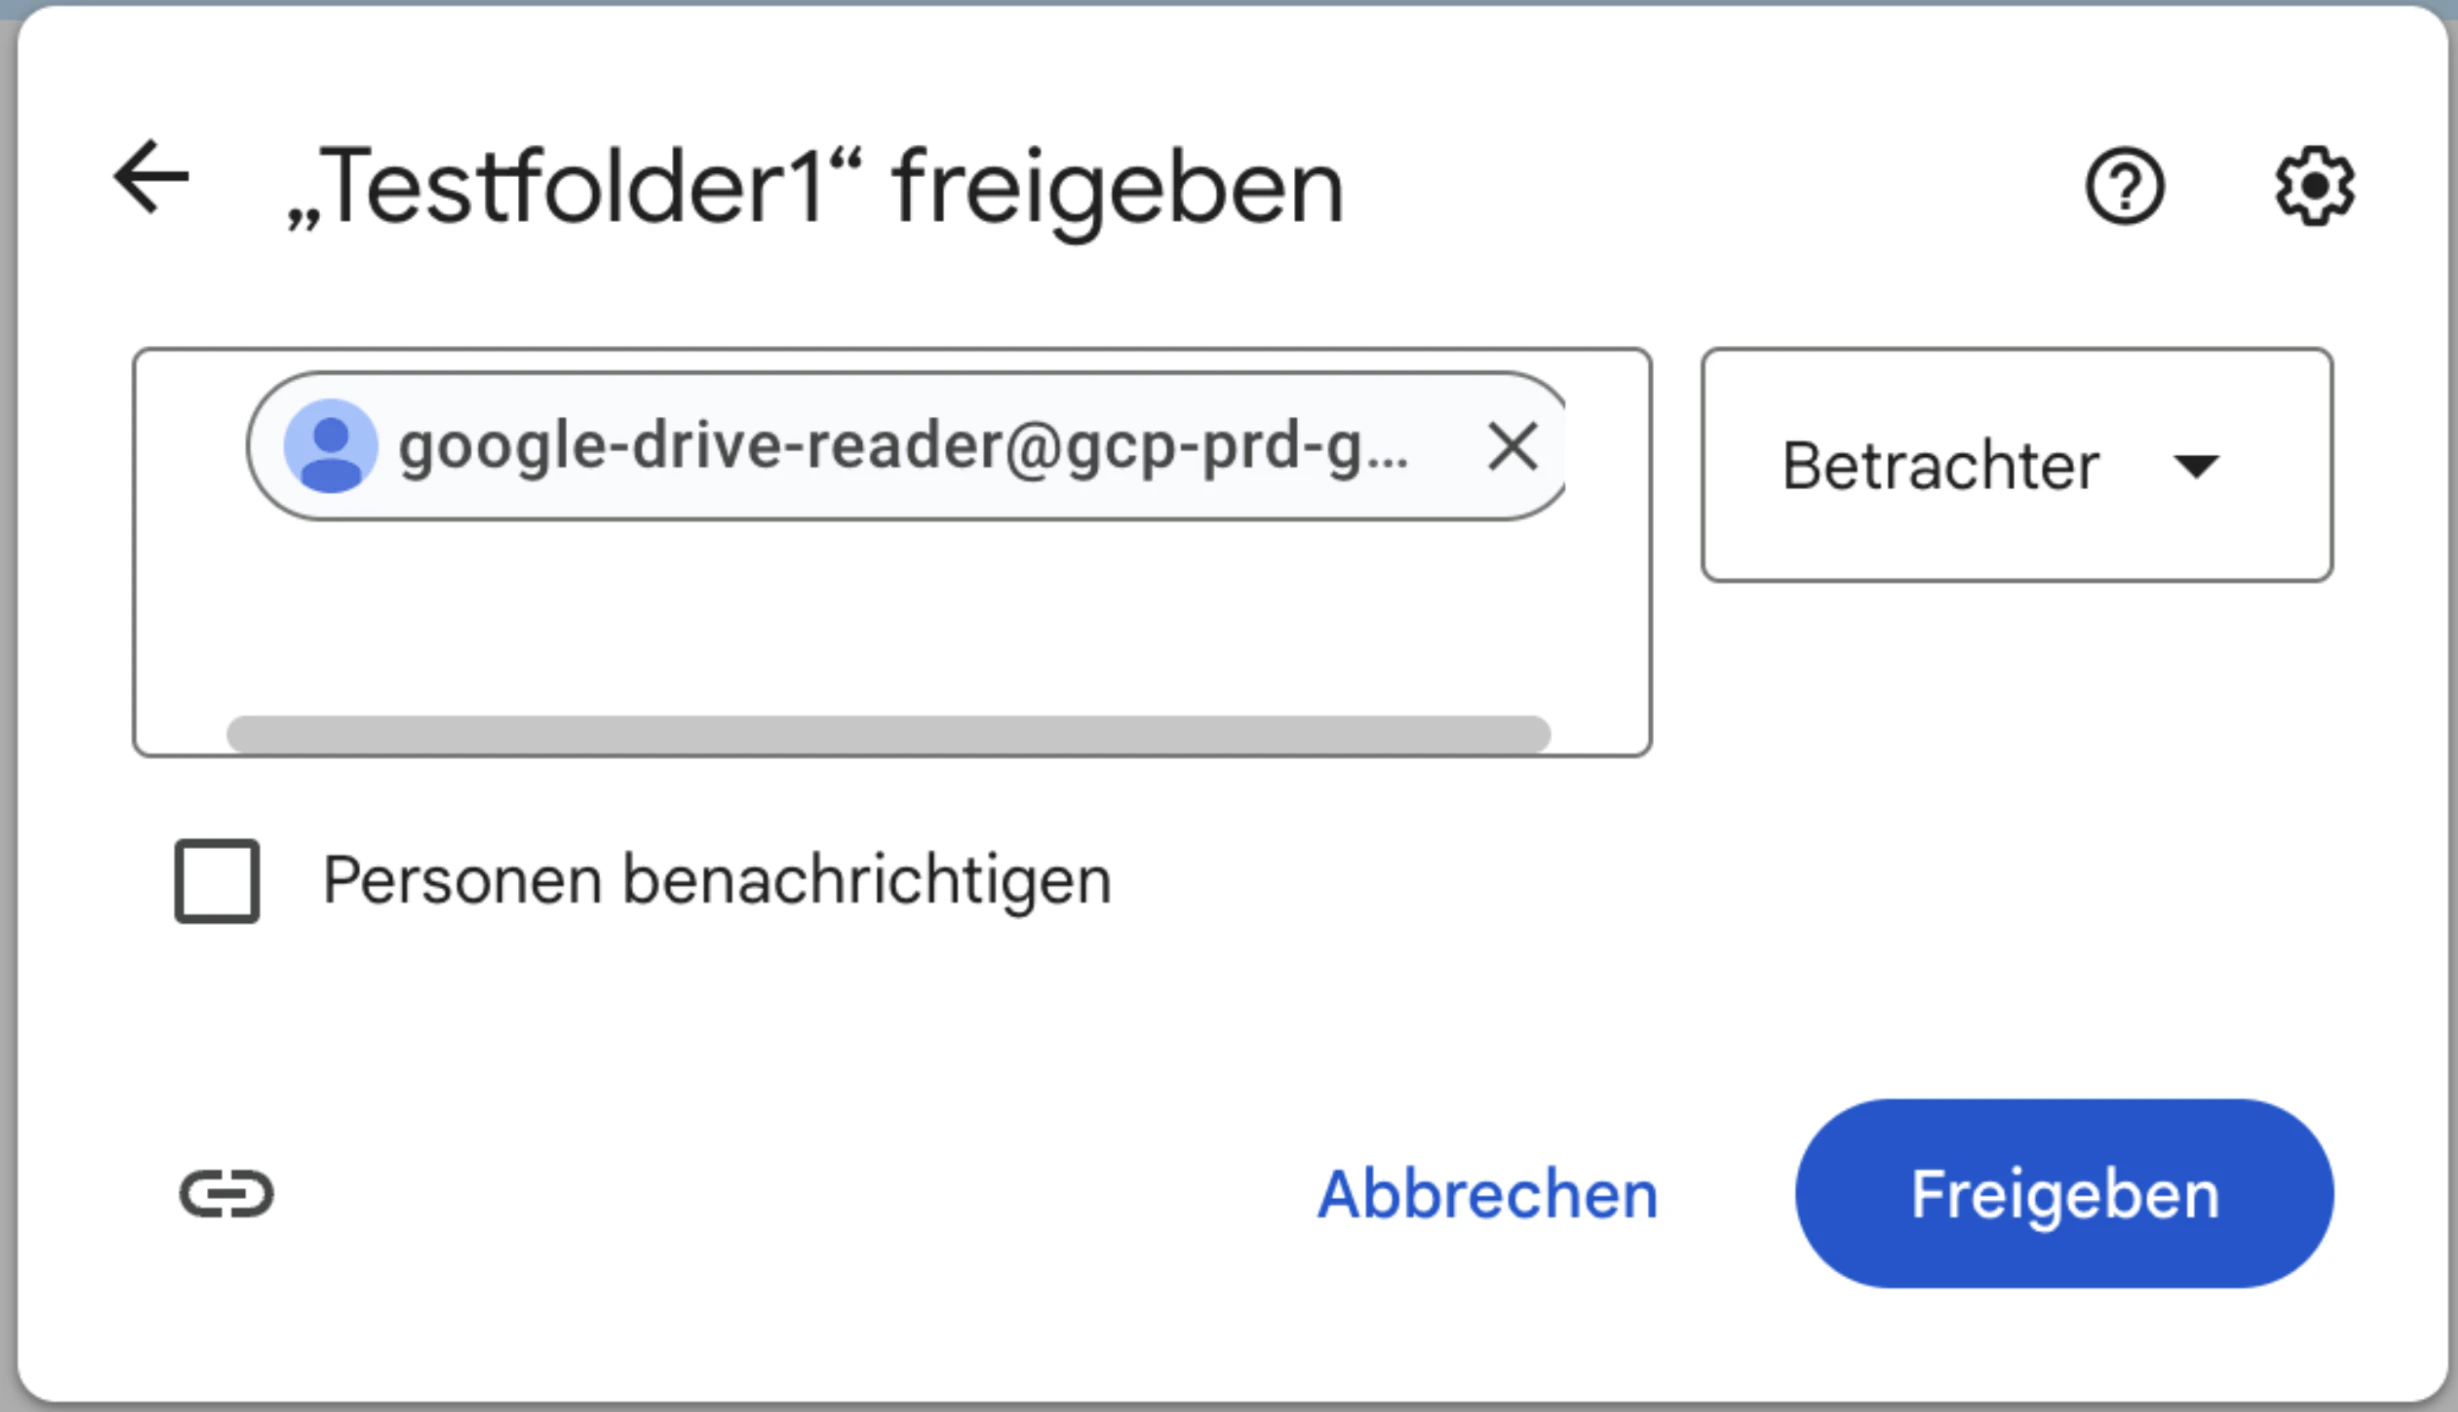
 In Google Drive, go to the root folder that contains your desired documents. Click on "Share".
Paste the e-mail address you copied from the admin panel. Deselect the option to notify the recipient and change the setting to "Viewer". Hit "Share" and accept the pop-up notification.
In Google Drive, go to the root folder that contains your desired documents. Click on "Share".
Paste the e-mail address you copied from the admin panel. Deselect the option to notify the recipient and change the setting to "Viewer". Hit "Share" and accept the pop-up notification.
 Afterwards the files and documents can be selected in the contents screen in the admin panel.
**Select all relevant folders or loose documents using the Files batch on each side to synchronize information.**
Afterwards the files and documents can be selected in the contents screen in the admin panel.
**Select all relevant folders or loose documents using the Files batch on each side to synchronize information.**
 #### File Type Selection
When configuring the scope of your Google Drive source, you can filter by file type to control which documents are synchronized. Only the selected file types will be included in the sync - all others are ignored.
#### FAQ
* If you add subfolders of folders already selected for a synchronization, you do not have to change the content configuration. Only if you added folders that are not part of an already selected folder do you have to change the configuration.
* If you delete elements in Google Drive and then perform a synchronization, the deleted elements will also be unavailable on the Genow platform.
* Files over 500 MB will not be synchronized. If needed, we automatically convert files to PDFs and split them into several files. They will not be modified in your own file system.
* Make sure your documents meet the requirements in the [Data Maintenance](/use-case-management/knowledge/data-maintenance) article.
To connect to your Jira data, you need to perform two steps:
**Please provide us the following information.** We will set up the service connection credentials for you. When creating a new Jira knowledge source you will have to select the assigned service connection.
**You will need the following things to set up and connect Jira:**
* Server URL,
* User account e-mail &
* User account access token;
**or a combination of**
* Personal Access Token (PAT) &
* Server URL.
When setting up a new Jira knowledge source, a JQL statement is needed. A JQL usually consists of three parts:
1. Field: The item to search against (e.g., project, status, assignee)
2. Operator: The comparison word (e.g., =, !=, IN, >).
3. Value: The specific item you're looking for (e.g., a project name, status, or user).
#### How to Find the JQL Statement in Jira
In Jira, select your project, go to "All Work" (German: Alle Vorgänge), click the Filter button on the top left above your list of issues:
1. Apply your needed filters to end up with the selection of issues relevant for your Agent.
2. In the same filter pop-up window, click on JQL to receive and copy your needed JQL statement.
Example: Each task has a process number, e.g., PROJ-2223. The prefix "PROJ" is sufficient as the project name. project="PROJ" would be the resulting JQL statement if you want every issue from the project exported to Genow.
#### File Type Selection
When configuring the scope of your Google Drive source, you can filter by file type to control which documents are synchronized. Only the selected file types will be included in the sync - all others are ignored.
#### FAQ
* If you add subfolders of folders already selected for a synchronization, you do not have to change the content configuration. Only if you added folders that are not part of an already selected folder do you have to change the configuration.
* If you delete elements in Google Drive and then perform a synchronization, the deleted elements will also be unavailable on the Genow platform.
* Files over 500 MB will not be synchronized. If needed, we automatically convert files to PDFs and split them into several files. They will not be modified in your own file system.
* Make sure your documents meet the requirements in the [Data Maintenance](/use-case-management/knowledge/data-maintenance) article.
To connect to your Jira data, you need to perform two steps:
**Please provide us the following information.** We will set up the service connection credentials for you. When creating a new Jira knowledge source you will have to select the assigned service connection.
**You will need the following things to set up and connect Jira:**
* Server URL,
* User account e-mail &
* User account access token;
**or a combination of**
* Personal Access Token (PAT) &
* Server URL.
When setting up a new Jira knowledge source, a JQL statement is needed. A JQL usually consists of three parts:
1. Field: The item to search against (e.g., project, status, assignee)
2. Operator: The comparison word (e.g., =, !=, IN, >).
3. Value: The specific item you're looking for (e.g., a project name, status, or user).
#### How to Find the JQL Statement in Jira
In Jira, select your project, go to "All Work" (German: Alle Vorgänge), click the Filter button on the top left above your list of issues:
1. Apply your needed filters to end up with the selection of issues relevant for your Agent.
2. In the same filter pop-up window, click on JQL to receive and copy your needed JQL statement.
Example: Each task has a process number, e.g., PROJ-2223. The prefix "PROJ" is sufficient as the project name. project="PROJ" would be the resulting JQL statement if you want every issue from the project exported to Genow.
 If you delete elements in Jira and then perform a synchronization, the deleted elements will also be unavailable on the Genow platform.
Custom Jira fields of your issues are currently not exported nor available in the Genow platform.
You will need the following things to set up and connect Confluence:
* Server URL
* API Token
* The e-mail of the user associated with the API token
For this step a **CQL statement** is needed. It mostly consists of three parts:
1. Field: The item you want to search for (e.g., title).
2. Operator: How to compare (e.g., =, \~ for "contains").
3. Value: The term you're looking for (e.g., "Meeting Notes").
You can extract your CQL statement after setting the filters in the article overview and exporting your URL. The URL will hold your CQL statement after the last '/'.
We support attachments and images. Labels can be used for filtering. Selecting "Use Confluence labels for filtering" in the synchronization screen will mean that labels assigned to your Confluence articles are synchronized as metadata. If you select this option for an already synchronized source, the entire source will be resynced.
**Preparation:**
* Reach out to your ServiceNow administrator for the creation of the ServiceNow credential. During the setup of the credential, it is important to follow our guide.
* Provide Genow with this credential.
**Knowledge Source Setup**
* Select ServiceNow as a connector.
* Enter a knowledge source name and choose your credential.
**Click Save & Sync to start the synchronization process. This may take a while to complete.**
***
## Managing Existing Assets and Sources
### Asset Details
Click on any asset in the knowledge overview to open the asset detail screen. Here you can:
* View the asset name and ID
* Toggle **Selected by Default** (whether users see this asset pre-checked when they open the Agent)
* Click Add Source to create a new source and connect it to this asset
* Click Add Knowledge Source to link an existing Agent-level source to this asset - without creating a new one
* View all connected sources in the sources table
* Edit, share, or delete individual sources
The Add Knowledge Source option lets you reuse sources that already exist within the Agent. A single source can be linked to one or more assets, so the same data connection can be made available in several places at once.
### Unassigned Sources
You can also create a Knowledge Source without assigning it to an asset right away. These sources are collected in a dedicated **Unassigned Sources** screen, so you can prepare and sync data before deciding where it belongs.
From there you can:
* **Link** an unassigned source to one or more assets to make it available to users.
* **Unlink** a source from an asset again. The source itself is kept - if it is no longer linked to any asset, it returns to the Unassigned Sources screen.
A source only becomes available to users once it is linked to at least one asset. A single source can be linked to multiple assets within the same Agent, but sources cannot be moved or shared across different Agents.
***
## Permissions
Once knowledge is set up, your IT department needs to assign the correct permissions so that users can access it.
> **Permission roles**, which hold a specific set of permissions for a knowledge asset, are assigned to a permission group from your company's IAM system.
We distinguish between two scenarios:
**1. All users (or a specific user group) should be able to access all knowledge assigned to the Agent:**
* Use our **standard roles** which cover all sources in the Agent.
* The needed role permission **can be exported from the Agent overview screen in the admin panel**.
* Notation: useCase.\[UseCaseID].User
**2. A user group should only have access to a specific set of knowledge sources:**
* Please reach out to **Genow** for help to create the specific role.
Your IT will need information about which users or user groups will need which permission. Provide them with a list of users or, if you already know a group where all your users are managed, provide the name of that group.
Provide your IT department with:
* The permission role
* A list of users (names, emails, permission group per user). A table format is recommended.
If you delete elements in Jira and then perform a synchronization, the deleted elements will also be unavailable on the Genow platform.
Custom Jira fields of your issues are currently not exported nor available in the Genow platform.
You will need the following things to set up and connect Confluence:
* Server URL
* API Token
* The e-mail of the user associated with the API token
For this step a **CQL statement** is needed. It mostly consists of three parts:
1. Field: The item you want to search for (e.g., title).
2. Operator: How to compare (e.g., =, \~ for "contains").
3. Value: The term you're looking for (e.g., "Meeting Notes").
You can extract your CQL statement after setting the filters in the article overview and exporting your URL. The URL will hold your CQL statement after the last '/'.
We support attachments and images. Labels can be used for filtering. Selecting "Use Confluence labels for filtering" in the synchronization screen will mean that labels assigned to your Confluence articles are synchronized as metadata. If you select this option for an already synchronized source, the entire source will be resynced.
**Preparation:**
* Reach out to your ServiceNow administrator for the creation of the ServiceNow credential. During the setup of the credential, it is important to follow our guide.
* Provide Genow with this credential.
**Knowledge Source Setup**
* Select ServiceNow as a connector.
* Enter a knowledge source name and choose your credential.
**Click Save & Sync to start the synchronization process. This may take a while to complete.**
***
## Managing Existing Assets and Sources
### Asset Details
Click on any asset in the knowledge overview to open the asset detail screen. Here you can:
* View the asset name and ID
* Toggle **Selected by Default** (whether users see this asset pre-checked when they open the Agent)
* Click Add Source to create a new source and connect it to this asset
* Click Add Knowledge Source to link an existing Agent-level source to this asset - without creating a new one
* View all connected sources in the sources table
* Edit, share, or delete individual sources
The Add Knowledge Source option lets you reuse sources that already exist within the Agent. A single source can be linked to one or more assets, so the same data connection can be made available in several places at once.
### Unassigned Sources
You can also create a Knowledge Source without assigning it to an asset right away. These sources are collected in a dedicated **Unassigned Sources** screen, so you can prepare and sync data before deciding where it belongs.
From there you can:
* **Link** an unassigned source to one or more assets to make it available to users.
* **Unlink** a source from an asset again. The source itself is kept - if it is no longer linked to any asset, it returns to the Unassigned Sources screen.
A source only becomes available to users once it is linked to at least one asset. A single source can be linked to multiple assets within the same Agent, but sources cannot be moved or shared across different Agents.
***
## Permissions
Once knowledge is set up, your IT department needs to assign the correct permissions so that users can access it.
> **Permission roles**, which hold a specific set of permissions for a knowledge asset, are assigned to a permission group from your company's IAM system.
We distinguish between two scenarios:
**1. All users (or a specific user group) should be able to access all knowledge assigned to the Agent:**
* Use our **standard roles** which cover all sources in the Agent.
* The needed role permission **can be exported from the Agent overview screen in the admin panel**.
* Notation: useCase.\[UseCaseID].User
**2. A user group should only have access to a specific set of knowledge sources:**
* Please reach out to **Genow** for help to create the specific role.
Your IT will need information about which users or user groups will need which permission. Provide them with a list of users or, if you already know a group where all your users are managed, provide the name of that group.
Provide your IT department with:
* The permission role
* A list of users (names, emails, permission group per user). A table format is recommended.