> ## Documentation Index
> Fetch the complete documentation index at: https://docs.genow.ai/llms.txt
> Use this file to discover all available pages before exploring further.
# Chat
> Learn how to use the chat.
In the chat, you can use the basic functionalities of language models (you may have already used language models such as ChatGPT). However, no company knowledge is referenced when you enter questions or input. Your input is anonymous and is not used for training AI models. We are GDPR (DSGVO) compliant!
***
### Understanding the Interface
Let's start with a quick look at the main screen.
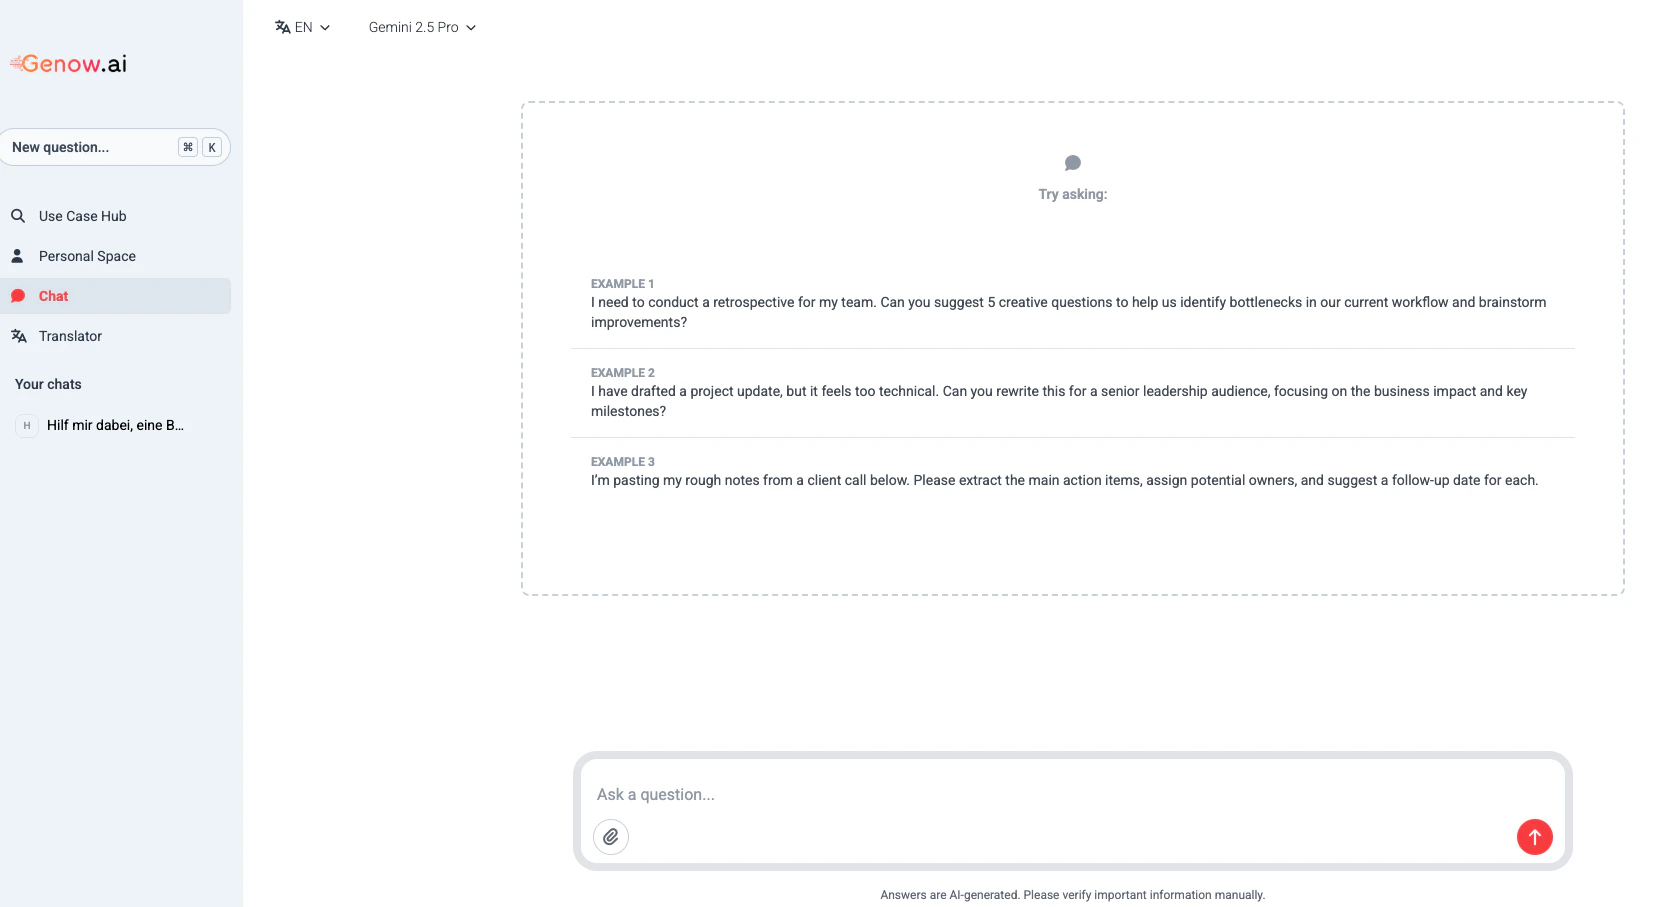 You'll primarily interact with a few key areas:
* **AI Model & Language Selection (Top Left):** This is where you can choose the underlying AI "brain" and set the language for the interface itself.
* **Chat History (Left Menu Bar):** Find all your previous conversations saved here for easy access.
* **Input Field (Bottom):** This is where you'll type your questions and instructions for the AI.
### Selecting Your AI Model and Language
In the top-left corner of your screen, you have two settings:
1. **AI Model:** By default, your assistant uses Google's powerful Gemini models. An **AI model** is the engine that powers the chat. The choice of model can influence the **quality**, **speed**, and **length** of the responses you receive. For example, a more advanced model might provide more creative and in-depth answers, while another model might be faster for quick, factual questions. You can switch between the available Gemini models to see which one best suits your current task.
**Good to know:** Our platform is "LLM Agnostic." This means we can connect to various Large Language Models. If your team has a specific need or would like to use a different model, please get in touch with your administrator.
2. **Interface Language:** You can also select your preferred language for the user interface menus and buttons from this dropdown.
***
### The Input Field: Asking Your First Questions
The input field at the bottom of the page is the heart of the assistant. This is where you communicate with the AI. Getting great results is all about asking in the right way. This is often called "prompting."
#### What Can I Use the AI Assistant For?
The possibilities are vast, but here are some common business use cases to get you started:
* **Summarize Information:** Copy and paste a long report, article, or email thread and ask, "Summarize the key points of this text in three bullet points."
* **Explain Complex Topics:** If you encounter a new concept, you can ask for a simple explanation. For example: *"What are Large Language Models (LLMs)?"*
* **Answer Specific Questions:** Ask direct questions to get factual information. For example: *"What are the basic principles of project management?"*
* **Brainstorming:** Generate ideas for marketing slogans, presentation outlines, or project names.
* **Drafting Content:** Get help writing emails, reports, or social media posts. You can specify the tone, audience, and key information to include.
#### Tips for Effective Prompting
How you frame your question (the "prompt") directly impacts the quality of the answer. You don't need to be a technical expert to write good prompts. Here are a few simple tips:
1. **Be Clear and Specific.** The more detail you provide, the better the result.
> **Instead of:** "Tell me about our software."
> **Try:** "Create a short description of our CRM software for a new sales employee. Mention the top three features."
2. **Provide Context.** Tell the AI what role to play or who the intended audience is. This helps it adopt the right tone and perspective.
> **Example:** "Act as a marketing manager. Write a friendly and exciting tweet about our upcoming webinar on Tuesday."
3. **Refine and Iterate.** Your first attempt doesn't have to be the last. If the answer isn't quite right, you can ask the AI to modify it.
> **Follow-up prompts:** "Make that answer more formal," "Can you expand on the second point?" or "Translate that response into German."
***
### Your Chat History
You never have to worry about losing valuable information. Every conversation you have with the AI assistant is automatically saved. You can find your **Chat History** in the menu bar on the left side of your screen. Simply click on a previous conversation to reload it and continue where you left off or just review the information.
Chat titles are generated automatically by the AI based on the content of the conversation - no manual naming required.
To rename a chat, click the three-dot menu next to any conversation in the sidebar and select Rename. Enter a new title and confirm.
We encourage you to experiment and see how the AI assistant can best support you in your role. Happy prompting!
***
## Sharing a Chat
You can share any conversation with colleagues - useful for getting a second opinion, handing off a thread, or keeping your team aligned.
### How to Share
Click the three-dot menu next to any chat in your sidebar and select Share. A dialog opens where you choose how to share:
* **Share with a specific person** - enter their email address. They will receive a notification that a chat was shared with them.
* **Create a public link** - generates a link that anyone with access can open, no login required.
For both options you also set the access level:
| Mode | What the recipient can do |
| ---------------- | ------------------------------------------------------------------------------------- |
| **Reader** | Read the conversation, view sources and the thinking process - no further interaction |
| **Collaborator** | Everything a Reader can do, plus ask follow-up questions and copy content |
### Finding Shared Chats
Chats shared with you appear in a separate **Shared Threads** group in your sidebar, collapsible and sorted by date. An indicator in the top-right corner of the chat shows who originally created it.
Removing a chat from your sidebar only removes your access to the shared copy — it does not delete the original conversation.
***
## Uploading Files via Clipboard
Instead of selecting files manually, you can paste screenshots and files directly into the input field using Ctrl+V (Windows/Linux) or Cmd+V (Mac).
This works for:
* Screenshots taken directly from your screen
* Image files copied from your file system
* Supported document files (where your browser allows it)
The pasted content appears in the upload preview the same way as a manually selected file. The same file type restrictions and size limits apply.
***
## Voice Input (Speech-to-Text)
You can speak your prompts instead of typing them. Click the microphone icon in the input field to start recording.
* A running timer shows how long you have been recording (up to 2 minutes).
* Click the stop icon to finish - your spoken words will be inserted as text at the cursor position.
* You can combine typing, pasting, and speaking within a single prompt.
* Genow will request microphone access from your browser the first time you use this feature.
Voice input is available in the chat, Agent Hub, Actions, and the Translator.
You'll primarily interact with a few key areas:
* **AI Model & Language Selection (Top Left):** This is where you can choose the underlying AI "brain" and set the language for the interface itself.
* **Chat History (Left Menu Bar):** Find all your previous conversations saved here for easy access.
* **Input Field (Bottom):** This is where you'll type your questions and instructions for the AI.
### Selecting Your AI Model and Language
In the top-left corner of your screen, you have two settings:
1. **AI Model:** By default, your assistant uses Google's powerful Gemini models. An **AI model** is the engine that powers the chat. The choice of model can influence the **quality**, **speed**, and **length** of the responses you receive. For example, a more advanced model might provide more creative and in-depth answers, while another model might be faster for quick, factual questions. You can switch between the available Gemini models to see which one best suits your current task.
**Good to know:** Our platform is "LLM Agnostic." This means we can connect to various Large Language Models. If your team has a specific need or would like to use a different model, please get in touch with your administrator.
2. **Interface Language:** You can also select your preferred language for the user interface menus and buttons from this dropdown.
***
### The Input Field: Asking Your First Questions
The input field at the bottom of the page is the heart of the assistant. This is where you communicate with the AI. Getting great results is all about asking in the right way. This is often called "prompting."
#### What Can I Use the AI Assistant For?
The possibilities are vast, but here are some common business use cases to get you started:
* **Summarize Information:** Copy and paste a long report, article, or email thread and ask, "Summarize the key points of this text in three bullet points."
* **Explain Complex Topics:** If you encounter a new concept, you can ask for a simple explanation. For example: *"What are Large Language Models (LLMs)?"*
* **Answer Specific Questions:** Ask direct questions to get factual information. For example: *"What are the basic principles of project management?"*
* **Brainstorming:** Generate ideas for marketing slogans, presentation outlines, or project names.
* **Drafting Content:** Get help writing emails, reports, or social media posts. You can specify the tone, audience, and key information to include.
#### Tips for Effective Prompting
How you frame your question (the "prompt") directly impacts the quality of the answer. You don't need to be a technical expert to write good prompts. Here are a few simple tips:
1. **Be Clear and Specific.** The more detail you provide, the better the result.
> **Instead of:** "Tell me about our software."
> **Try:** "Create a short description of our CRM software for a new sales employee. Mention the top three features."
2. **Provide Context.** Tell the AI what role to play or who the intended audience is. This helps it adopt the right tone and perspective.
> **Example:** "Act as a marketing manager. Write a friendly and exciting tweet about our upcoming webinar on Tuesday."
3. **Refine and Iterate.** Your first attempt doesn't have to be the last. If the answer isn't quite right, you can ask the AI to modify it.
> **Follow-up prompts:** "Make that answer more formal," "Can you expand on the second point?" or "Translate that response into German."
***
### Your Chat History
You never have to worry about losing valuable information. Every conversation you have with the AI assistant is automatically saved. You can find your **Chat History** in the menu bar on the left side of your screen. Simply click on a previous conversation to reload it and continue where you left off or just review the information.
Chat titles are generated automatically by the AI based on the content of the conversation - no manual naming required.
To rename a chat, click the three-dot menu next to any conversation in the sidebar and select Rename. Enter a new title and confirm.
We encourage you to experiment and see how the AI assistant can best support you in your role. Happy prompting!
***
## Sharing a Chat
You can share any conversation with colleagues - useful for getting a second opinion, handing off a thread, or keeping your team aligned.
### How to Share
Click the three-dot menu next to any chat in your sidebar and select Share. A dialog opens where you choose how to share:
* **Share with a specific person** - enter their email address. They will receive a notification that a chat was shared with them.
* **Create a public link** - generates a link that anyone with access can open, no login required.
For both options you also set the access level:
| Mode | What the recipient can do |
| ---------------- | ------------------------------------------------------------------------------------- |
| **Reader** | Read the conversation, view sources and the thinking process - no further interaction |
| **Collaborator** | Everything a Reader can do, plus ask follow-up questions and copy content |
### Finding Shared Chats
Chats shared with you appear in a separate **Shared Threads** group in your sidebar, collapsible and sorted by date. An indicator in the top-right corner of the chat shows who originally created it.
Removing a chat from your sidebar only removes your access to the shared copy — it does not delete the original conversation.
***
## Uploading Files via Clipboard
Instead of selecting files manually, you can paste screenshots and files directly into the input field using Ctrl+V (Windows/Linux) or Cmd+V (Mac).
This works for:
* Screenshots taken directly from your screen
* Image files copied from your file system
* Supported document files (where your browser allows it)
The pasted content appears in the upload preview the same way as a manually selected file. The same file type restrictions and size limits apply.
***
## Voice Input (Speech-to-Text)
You can speak your prompts instead of typing them. Click the microphone icon in the input field to start recording.
* A running timer shows how long you have been recording (up to 2 minutes).
* Click the stop icon to finish - your spoken words will be inserted as text at the cursor position.
* You can combine typing, pasting, and speaking within a single prompt.
* Genow will request microphone access from your browser the first time you use this feature.
Voice input is available in the chat, Agent Hub, Actions, and the Translator.