> ## Documentation Index
> Fetch the complete documentation index at: https://docs.genow.ai/llms.txt
> Use this file to discover all available pages before exploring further.
# Create and Manage Permissions
> Learn how to provide access permissions to Genow depending on different user roles.
After users have received the permission to access the platform, additional permissions are required to view Agents and their corresponding knowledge. Our role-based permission concept is designed so that complex permission structures can be implemented at agent level.
> To manage the platform and access every Agent in both the admin panel and the Agent Hub, you will need the '**Global Admin**' permission. Please take a look at the permissions scheme below. **Please also make sure to assign this role to Genow.**
***
## How to Manage Permissions
> When setting up Genow, you can choose from two different approaches for managing permissions. We recommend deciding on this at the start of the setup process. If you wish to change your chosen approach, please contact Genow. Both options generally work in parallel, but we recommend choosing one option and sticking to it.
### Option 1: Share Entities Directly to Users and Groups via the Admin Panel (Recommended)
Share entities directly to individual users by entering their email address - or add multiple users at once via a CSV file. This gives you the most flexibility and the lowest overhead, without needing to maintain group structures in your IAM for every scenario.
Please let us know if you would like this option to be made available to use case administrators as well.
By default, Agent Admins can create new Knowledge Sources within their Agent. If needed, this permission can be restricted so that only Global Admins can create sources. Contact Genow to enable this restriction for your platform.
If you are using Google SAML, you can also share knowledge entities with Workspace groups using their email.
You can share knowledge entities with Entra ID groups by entering the group's **Object ID** in the sharing dialog. Before you can use this, a one-time setup in your Entra ID app registration is required - see the expandable guide below.
If you want to use group claims/emails, your Entra ID or Workspace administrator will need to create a group for each user group in Entra ID or Workspace, assigning individual access rights. They will then need to use the group claim in the admin panel to share knowledge entities.
To ensure users can log in to the platform, at least one authentication group containing all end users must still exist in your IAM system.
***
### Option 2: IAM Permission Management with Role Permissions
Permissions are managed directly in your IAM system using **App Roles in Entra ID** or **Google Workspace groups assigned via the Admin Panel**. Each permission level is defined as an individual App Role or group assignment.
This approach offers the most granular control and is fully supported alongside the newer option. If you need custom roles that hold a subset of permissions of an Agent (e.g. the permission to only access a specific asset or source), you will need to reach out to Genow.
***
## How to Share Knowledge Entities Or Create And Permissions
**Creating user permissions is done in two steps:**
Identify relevant admin and user groups for your use cases.
Share knowledge entities via the share button (option 1 ) or create your permissions in either Entra ID or directly assign permissions to Google Workspace groups via the user configuration in the admin panel (option 2).
Share knowledge entities via the share button (option 1 ) or create your permissions in either Entra ID or directly assign permissions to Google Workspace groups via the user configuration in the admin panel (option 2).
***
## (1) Identify and create Groups
> **If you are setting up Genow the first time**, please identify a group of platform admins first, which will be able to manage the platform itself as well as create and manage every agent on the platform. This group of people will receive the global.Admin role either via Entra ID or the admin panel. Follow the guide for option 2 to do this one time.
**When it comes to creating and introducing a new agent**, the agent admin, which will manage the agent corresponding to his domain or team, should think about whether there are different user groups with different access rights to specific agent data.
* For an example Agent, there is general information as well as specific information intended for a dedicated sub-user group.
* This results in two sources: general knowledge & specific knowledge and two authorization groups: Access to general knowledge & Access to specific knowledge.
* Two assets can be created that are displayed depending on the authorization or one asset that looks the same for each user but contains different data depending on the user.
***
## (2) Create and Assign Permissions
In addition to managing permissions via your IAM system (Entra ID or Google), Agents, Knowledge Assets, and Knowledge Sources can now be shared directly from within the admin panel - no external configuration required.
In-app sharing must be activated for your environment. Contact your Genow administrator if the Share button is not visible in your admin panel.
### How It Works
A Share button is available on every Agent, Knowledge Asset, and Knowledge Source - both in the overview table and in the detail view. Clicking it opens a sharing dialog where you can grant access to:
* **Option 1: Groups** - by group email (Google SAML with Workspace) or by group Object ID from Entra ID.
Please note, that you have to perform a one time IT setup for those groups. Expand the “One-Time Setup: Configure Entra ID for Group Sharing” section below to learn more.
(Entra ID - requires one-time IT setup, see expandable guide below).
* **Option 2: Individual users** - by email address - or **multiple entries at once** - via CSV bulk upload
**If you want to share entities to groups, you first have to create them. You can find a short guide on how to do this below.**
Create the necessary groups via your Google Workspace and add the users to the group. Find more information in the Google Workspace documentation.
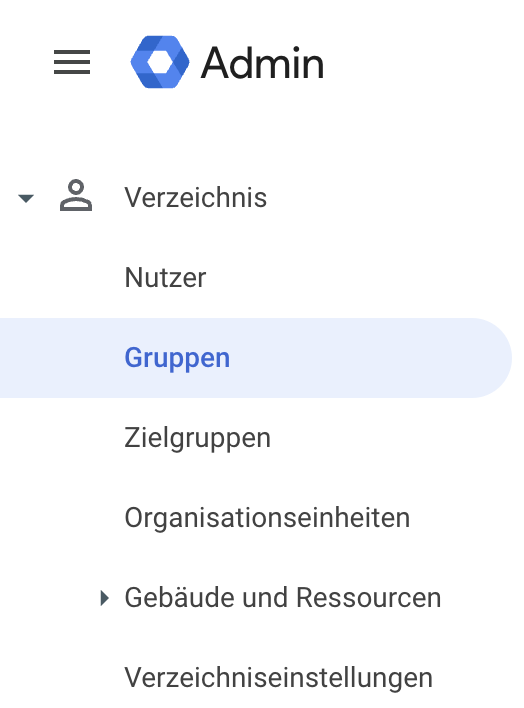
For this, navigate to "Directory" in your Google Workspace admin section.
Create a new Workspace group for your new permission group.
Copy the group's email address. This will be used to assign the necessary permissions via the Genow admin panel .
This setup is done once by your IT or Entra ID administrator.
**Step 1: Update the App Manifest:** In your Entra ID app registration, open the **Manifest** and set the following property:
```json theme={null}
"groupMembershipClaims": "ApplicationGroup"
```
We recommend the `ApplicationGroup` mode - it only includes groups that are explicitly assigned to the application, which is more efficient for large directories.
Do NOT enable "Emit groups as roles" - this setting is not compatible with the Genow group sharing feature.
**Step 2: Add API Permissions:**
Depending on the mode you chose, add the following API permissions to the app registration:
| Mode | Required API Permissions |
| :----------------------------- | :-------------------------------------------- |
| ApplicationGroup (recommended) | `User.ReadBasic.All` + `GroupMember.Read.All` |
| SecurityGroup | `User.Read.All` + `GroupMember.Read.All` |
| DirectoryRole | `User.Read.All` |
| All | `User.Read.All` + `GroupMember.Read.All` |
Alternatively, `Directory.Read.All` works for all configurations but grants broader access.
**Step 3: Assign Groups to the Application:**
Make sure the Entra ID groups you want to use for sharing are assigned to the Genow application in Entra ID (Enterprise Apps → Genow → Users and Groups).
**Step 4: Share in Genow**
Once the setup is complete, you can share any Agent, Asset, or Source with an Entra group:
1. Navigate to the entity you want to share.
2. Click the Share button.
3. Click Invite new user.
4. Enter the **Object ID** of the Entra group.
5. Select the access level (User or Admin).
6. Click Save.
### Sharing Levels
The scope of access depends on which entity you share:
| Entity shared | Access granted |
| :------------------- | :--------------------------------------------- |
| **Agent** | User access to all knowledge within the Agent. |
| **Knowledge Asset** | User access to all sources within that asset. |
| **Knowledge Source** | User access to that specific source only. |
### Who Can Share What
| Role | Can share |
| :--------------- | :------------------------------------------------------------------- |
| **Agent Admin** | User rights on Agents, Assets, and Sources they manage |
| **Global Admin** | User rights on any entity; additionally, Admin rights at Agent level |
### Managing Existing Shares
The sharing dialog shows which users and groups have direct access to each entity. You can revoke any share from this screen. Only direct shares are listed - indirect access (e.g. from a parent Agent share) is not shown at the source level.
Before creating and managing role permissions in EntraID, Genow should have been registered as an app in EntraID. [Find more information here](/platform-management/setup/authentication)
**If this have not been done before, first create the needed groups (see step 1).**
Two further steps are then required. [Please also refer to the Microsoft documentation for these two steps:](https://learn.microsoft.com/en-us/entra/identity-platform/howto-add-app-roles-in-apps#assign-users-and-groups-to-roles)
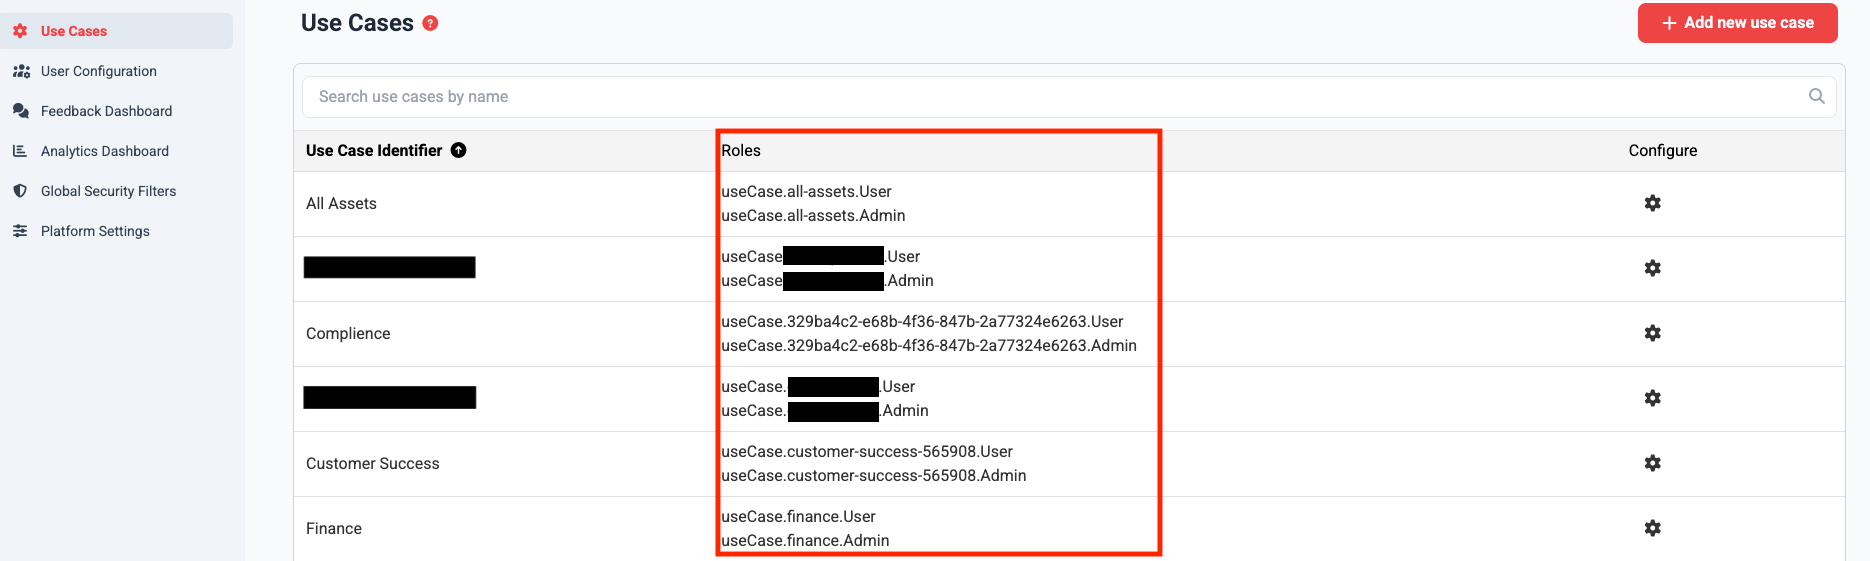
You can find the standard roles for Agents in the admin panel of the Genow platform.
* Go to the admin panel via the button in the top right-hand corner of the main view, then navigate to Agents. If you are an admin, you can also access this page directly by adding /admin/use-cases to your Genow URL.
* On this page, you will find all standard role permissions for every Agent.
* They have the following format: `useCase.[UseCaseID].Admin` and `useCase.[UseCaseID].User`.
Note that custom roles which grant specific access to a restricted amount of knowledge source have to be created by Genow.
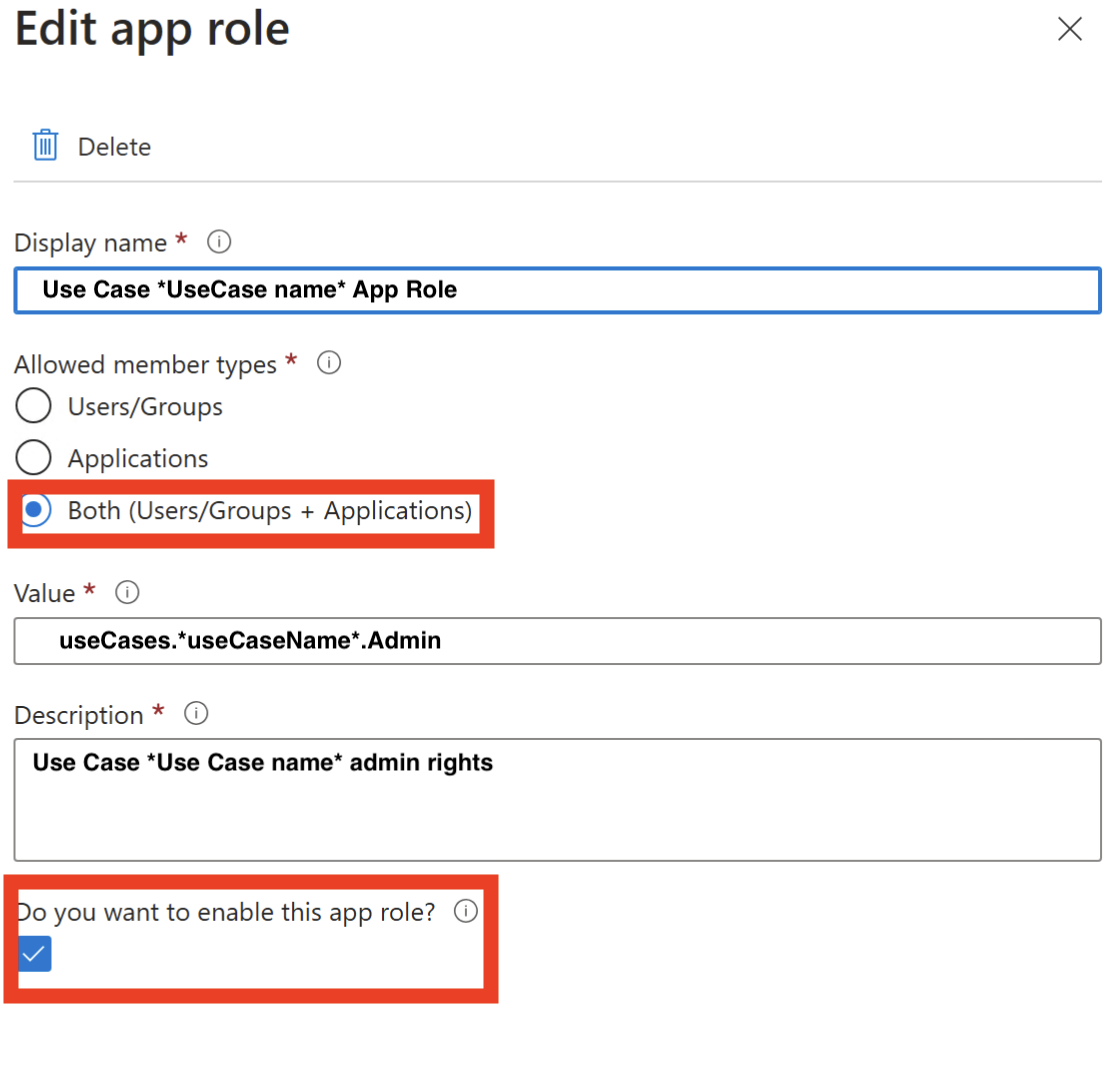
 You can create app roles via the Microsoft Entra Admin Center. To do this, follow the instructions from Microsoft. In the user interface of entra you can navigate to the App Roles via the menu on the left-hand side (App registrations -> Enter application name -> App roles). There you can create app roles and assign authorizations.
* When you create an app role, a value is required. **This value represents a specific role permission**. For example: *useCase.testUseCase.User*
* You need a **new app role for every possible role permission**.
* You can add a description to ensure better clarity in the management of rights.
You can create app roles via the Microsoft Entra Admin Center. To do this, follow the instructions from Microsoft. In the user interface of entra you can navigate to the App Roles via the menu on the left-hand side (App registrations -> Enter application name -> App roles). There you can create app roles and assign authorizations.
* When you create an app role, a value is required. **This value represents a specific role permission**. For example: *useCase.testUseCase.User*
* You need a **new app role for every possible role permission**.
* You can add a description to ensure better clarity in the management of rights.
 Make sure to choose allowed member types: both
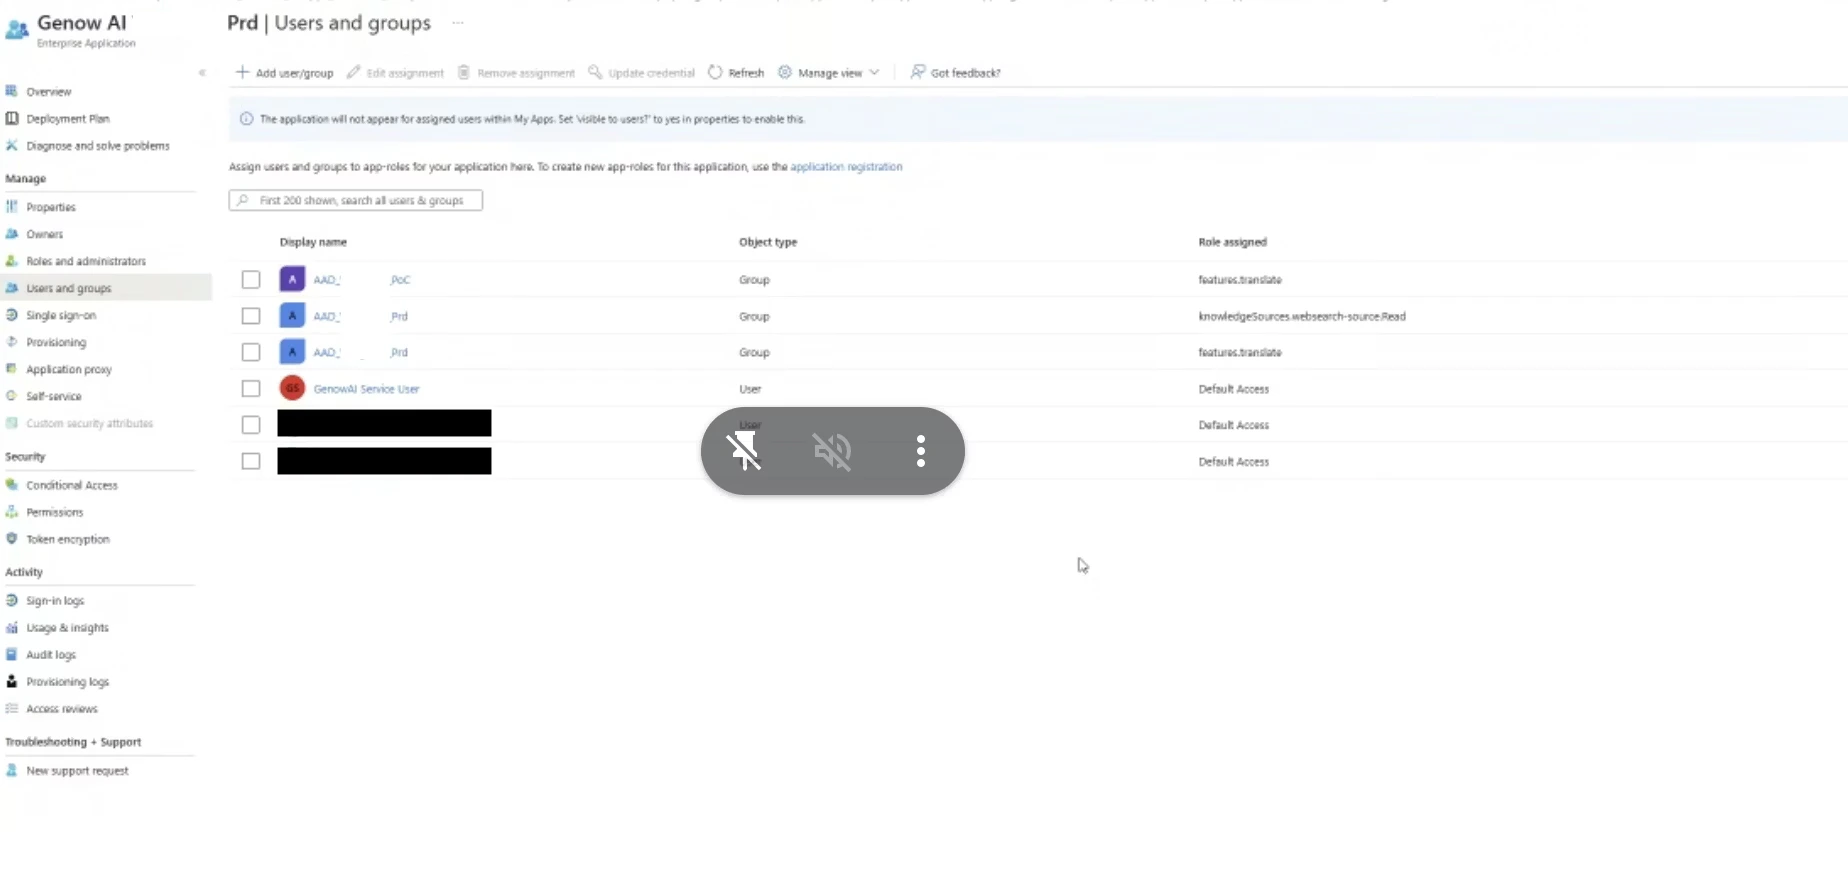
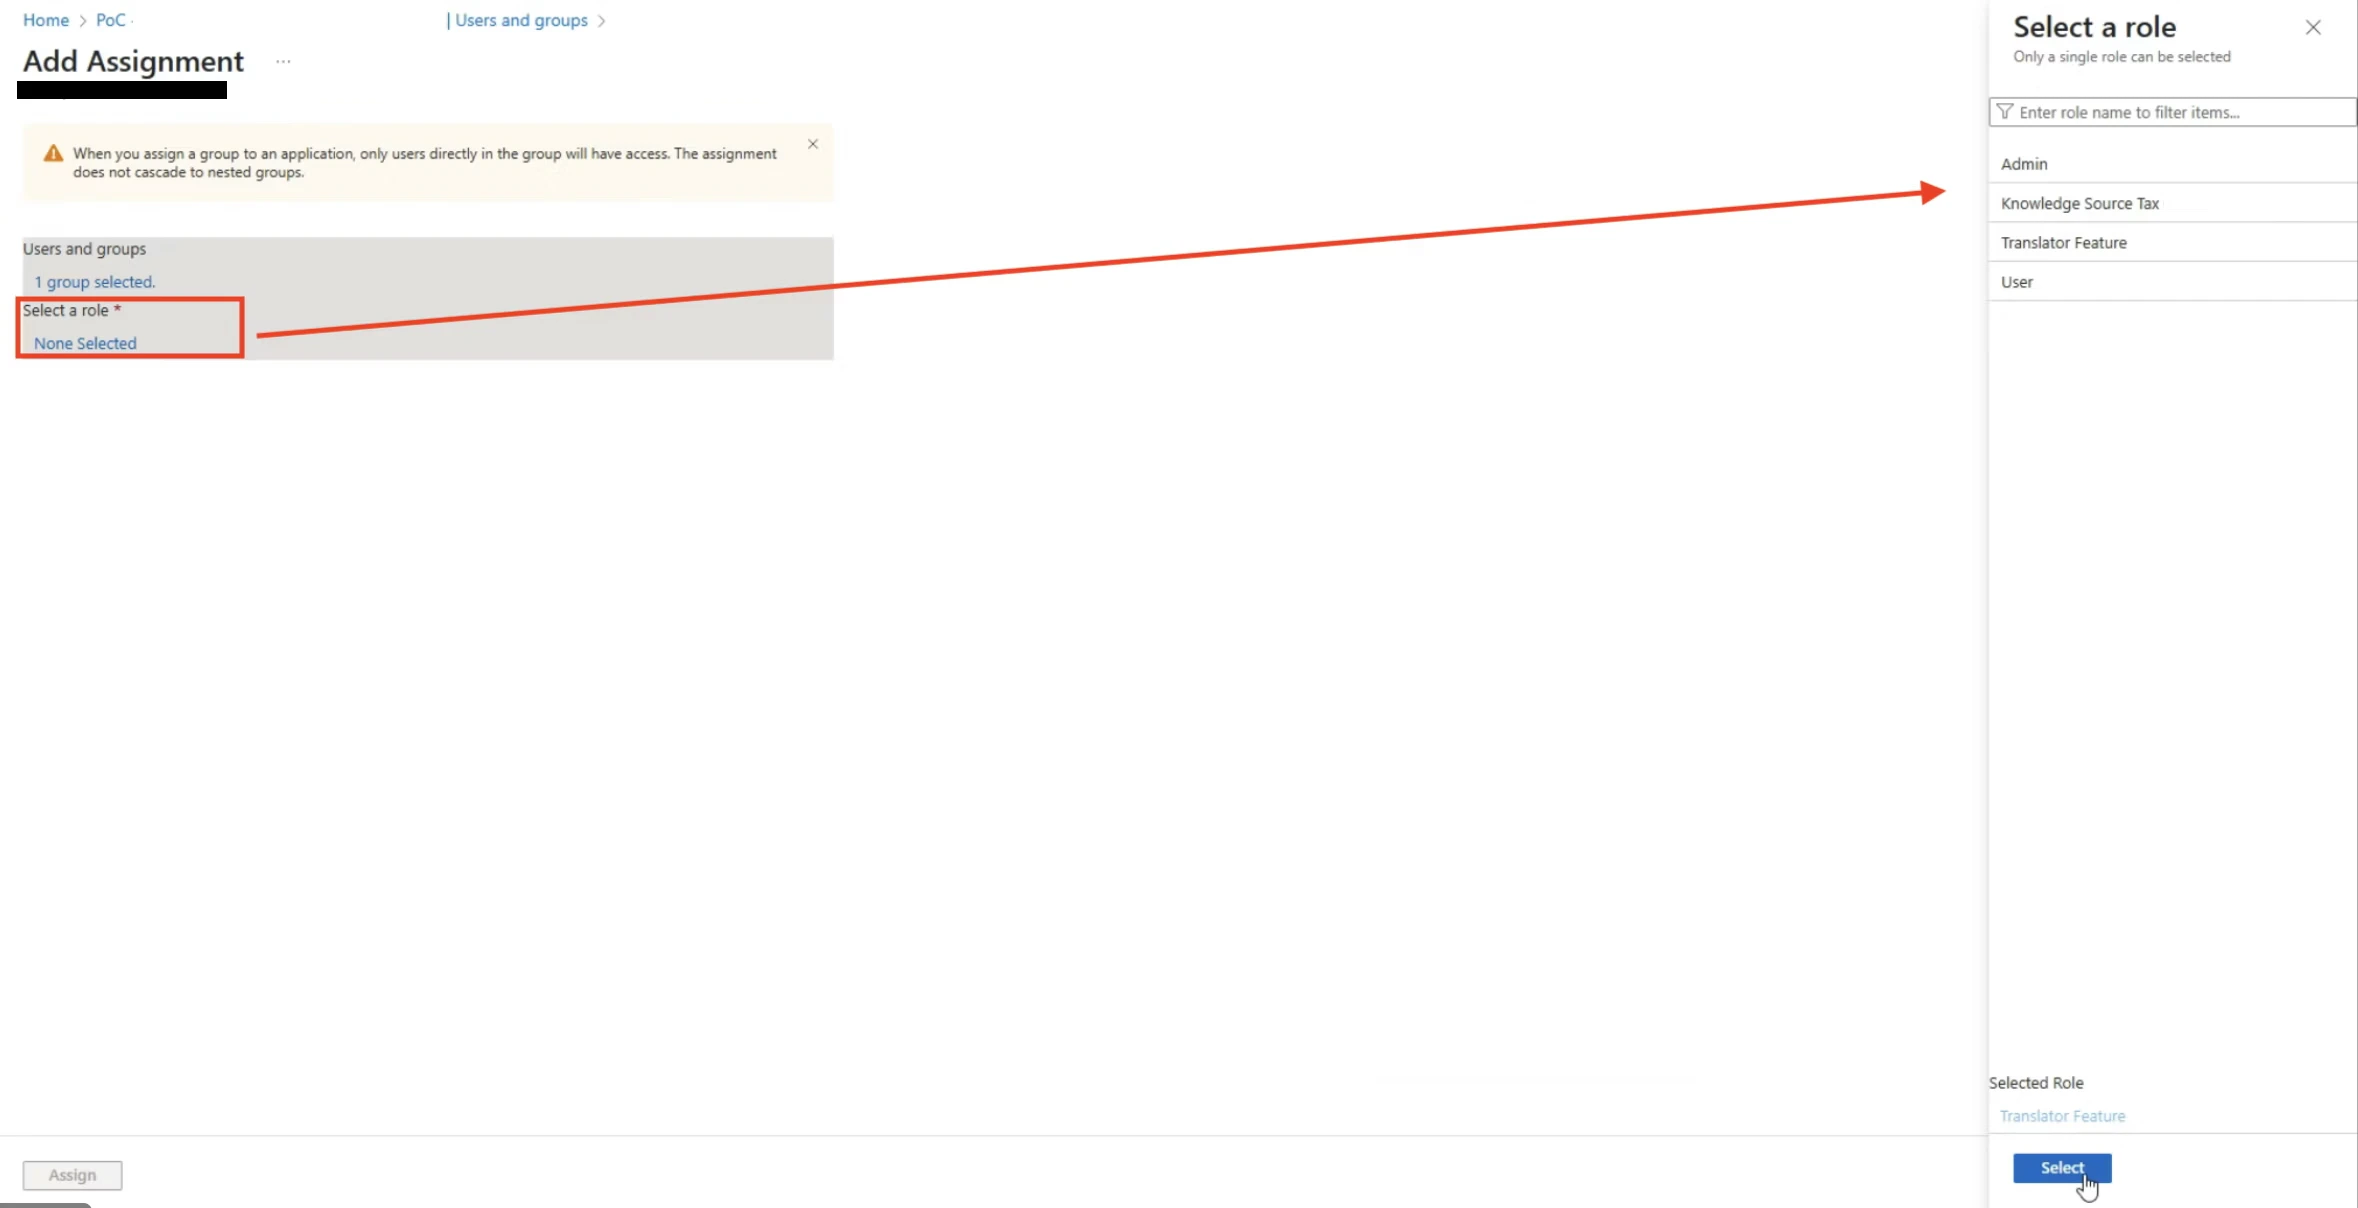
 * Once you have created the app roles, you need to assign them to groups.
* You can assign these to the groups in order to authorize them to knowledge sources and thus also knowledge assets and Agents.
* EntraID navigation: You can access this configuration by navigating to Enterprise apps -> Enter the app name -> and then select `Users and Groups` via the left menu bar (Screenshot below).
* Then klick the plus-button "add user/group". Each app role (/user permission) needs to be added individually.
* Once you have created the app roles, you need to assign them to groups.
* You can assign these to the groups in order to authorize them to knowledge sources and thus also knowledge assets and Agents.
* EntraID navigation: You can access this configuration by navigating to Enterprise apps -> Enter the app name -> and then select `Users and Groups` via the left menu bar (Screenshot below).
* Then klick the plus-button "add user/group". Each app role (/user permission) needs to be added individually.
 * Once you have created the app roles, you need to assign them to groups.
* You can assign these to the groups in order to authorize them to knowledge sources and thus also knowledge assets and Agents.
* EntraID navigation: You can access this configuration by navigating to Enterprise apps -> Enter the app name -> and then select `Users and Groups` via the left menu bar (Screenshot below).
* Then click the plus-button "add user/group". Each app role (/user permission) needs to be added individually.
If you are using Google as your IAM provider, you can assign roles to groups using their email via the Genow admin panel. This can be done in just two steps:
You can find the standard roles for Agents in the admin panel of the Genow platform.
* Go to the admin panel via the button in the top right-hand corner of the main view, then navigate to Agents. If you are an admin, you can also access this page directly by adding /admin/use-cases to your Genow URL.
* On this page, you will find all standard role permissions for every Agent.
* They have the following format: `useCase.[UseCaseID].Admin` and `useCase.[UseCaseID].User`.
Note that custom roles which grant specific access to a restricted amount of knowledge source have to be created by Genow.
Create the necessary groups via your Google Workspace and add the users to the group. [Find more information in the Google Workspace documentation. ](https://support.google.com/a/answer/9400082?hl=en)
* For this, navigate to "Directory" in your Google Workspace admin section.
* Create a new Workspace group for your new permission group.
* Copy the group's email address. This will be used to assign the necessary permissions via the Genow admin panel (see step 2).
* Once you have created the app roles, you need to assign them to groups.
* You can assign these to the groups in order to authorize them to knowledge sources and thus also knowledge assets and Agents.
* EntraID navigation: You can access this configuration by navigating to Enterprise apps -> Enter the app name -> and then select `Users and Groups` via the left menu bar (Screenshot below).
* Then click the plus-button "add user/group". Each app role (/user permission) needs to be added individually.
If you are using Google as your IAM provider, you can assign roles to groups using their email via the Genow admin panel. This can be done in just two steps:
You can find the standard roles for Agents in the admin panel of the Genow platform.
* Go to the admin panel via the button in the top right-hand corner of the main view, then navigate to Agents. If you are an admin, you can also access this page directly by adding /admin/use-cases to your Genow URL.
* On this page, you will find all standard role permissions for every Agent.
* They have the following format: `useCase.[UseCaseID].Admin` and `useCase.[UseCaseID].User`.
Note that custom roles which grant specific access to a restricted amount of knowledge source have to be created by Genow.
Create the necessary groups via your Google Workspace and add the users to the group. [Find more information in the Google Workspace documentation. ](https://support.google.com/a/answer/9400082?hl=en)
* For this, navigate to "Directory" in your Google Workspace admin section.
* Create a new Workspace group for your new permission group.
* Copy the group's email address. This will be used to assign the necessary permissions via the Genow admin panel (see step 2).
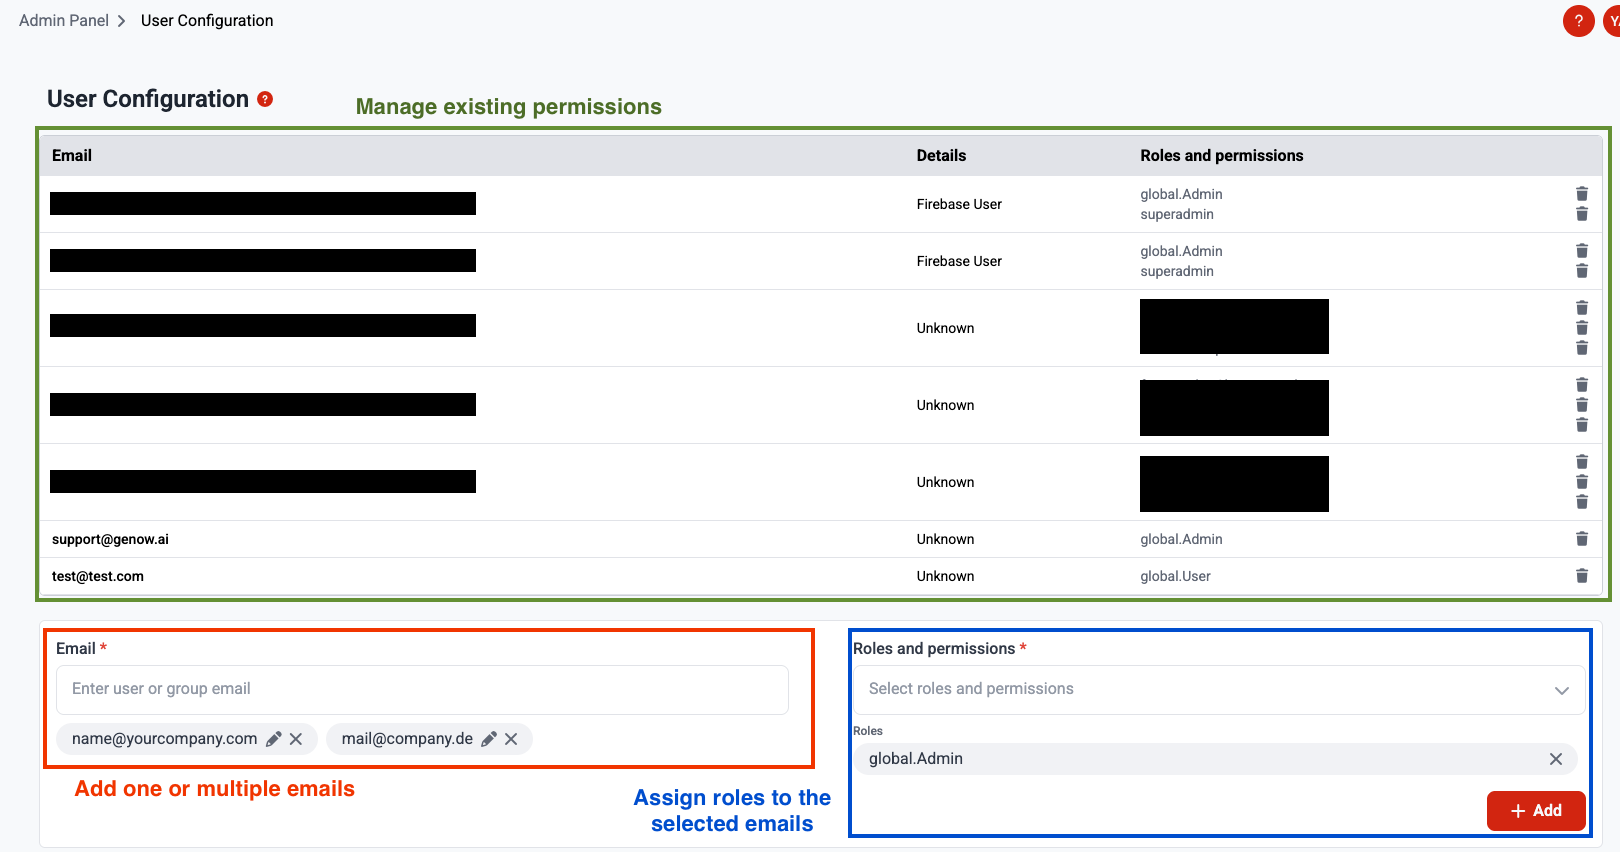
 Via the User Configuration screen in the **admin panel**, which you can find via the left hand menu bar, you can then assign role permissions to the group using the **groups email**.
Instead of groups, you can also **assign roles to users directly**. To do this, create a user in the GCP Identity Platform for your project. Then, on the same user configuration screen in the admin panel, assign the required permissions to the user's email address. However, **for a consistent and well-organized process, we recommend to always use workspace groups.**
Via the User Configuration screen in the **admin panel**, which you can find via the left hand menu bar, you can then assign role permissions to the group using the **groups email**.
Instead of groups, you can also **assign roles to users directly**. To do this, create a user in the GCP Identity Platform for your project. Then, on the same user configuration screen in the admin panel, assign the required permissions to the user's email address. However, **for a consistent and well-organized process, we recommend to always use workspace groups.**
 ### Role-Based Permissions
**Basic idea:** **Roles** are assigned to users, with each role receiving several subordinate permissions. This assignment takes place in the background and can be configured at the Agent level, for example. A user can have multiple roles.
> This means, that **for each permission group, you will only need one role**, which groups the necessary permissions. This allows for an easy creation and management of permission.
The following roles and permission scheme is only needed if you are using option 2 for managing permissions: IAM Permission Management with Role Permissions.
### Standard Roles
| **Name** | **Persona** | **Role** |
| -------------------- | -------------------------------------------------------------------------------------------------------------------------------------------------------------------------------------------------------------------------------------------------------------------------------------------------------------------------------------------------------------------------------------------------------------------------------------------------------------------------------------------------------------------------------------------------- | ------------------------------- |
| **Global Admin** | **Platform Organizer / Owner:**
### Role-Based Permissions
**Basic idea:** **Roles** are assigned to users, with each role receiving several subordinate permissions. This assignment takes place in the background and can be configured at the Agent level, for example. A user can have multiple roles.
> This means, that **for each permission group, you will only need one role**, which groups the necessary permissions. This allows for an easy creation and management of permission.
The following roles and permission scheme is only needed if you are using option 2 for managing permissions: IAM Permission Management with Role Permissions.
### Standard Roles
| **Name** | **Persona** | **Role** |
| -------------------- | -------------------------------------------------------------------------------------------------------------------------------------------------------------------------------------------------------------------------------------------------------------------------------------------------------------------------------------------------------------------------------------------------------------------------------------------------------------------------------------------------------------------------------------------------- | ------------------------------- |
| **Global Admin** | **Platform Organizer / Owner:**
- Has *unrestricted access to the entire system*
- Responsible for configuring the organization
- Works in central corporate management, IT (e.g., IT project manager)
**Typical tasks:**
-Create use cases
-Manage use cases
- Configure global platform settings
- Evaluate feedback on all use cases | **global.Admin** |
| **Global User** | **Management Users:**
- Has *User-level access to all Agents in the Agent Hub*, but **no admin permissions**
- Can query and retrieve knowledge across every Agent, but cannot make changes or access the admin panel
- Uses the platform as a system-wide source of information
- Active in executive management/management, HR, strategy, communication
**Typical tasks:**
- Access and query knowledge across all Agents in the Agent Hub
- Use the platform as a central source of information | **global.User** |
| **Agent Admin** | **Team Lead / Domain Expert**
- Responsible for a specific Agent or area - able to *fully manage this Agent or area*
- Can control content, teams, and permissions within this Agent
- Active in specialist areas (e.g., sales), project or innovation management
**Typical tasks:**
- Fill Agent with knowledge
- Responsible for quality, data, and knowledge within the Agent
- Make Agent-specific settings | **useCase.\[useCaseID].Admin** |
| **Agent User** | **Specialist users / Agent users**
- Has access to *every knowledge of an Agent* and can submit queries based on this knowledge
- Can use features that are enabled for the Agent.
- Works as a skilled worker, etc.
**Typical tasks:**
- Retrieve knowledge and submit queries based *on all sources of the Agent.*
- Use Agent-related documents or data. | **useCase.\[useCaseID].User** |
| **Feature User** | **Function user / feature user**
- Uses specific features (e.g., chat, translator) for which they are authorized
**Typical tasks:**
- Working with a specific feature, e.g., chat | **feature.\[featureName].User** |
| **Use Case Creator** | **Team Lead / Project Owner**
- Can create new Agents without needing Global Admin rights
- Automatically becomes the Agent Admin for every Agent they create
- Has no access to other Agents unless explicitly granted
**Typical tasks:**
- Create and set up new Agents
- Manage the Agents they own | **useCase.Creator** |
**Use Case Creators need credentials to connect data.** A Use Case Creator can set up new Agents, but they can only select connectors and start syncs for data sources whose **credentials have been shared with them**. When you assign the Use Case Creator role, also share the required credentials with that user via Platform Settings → Credentials Management (Person assignment). Learn more in the [Credentials Management](/platform-management/settings/platform-settings#credentials-management) section.
### Custom Roles
* Custom roles hold a specific, non-standard set of permissions.
* They will be automatically created in the admin panel on Agent level
* They can also be customized, i.e., created through the database, enabling individual creations.
Export the groups emails of your Google Groups and assign the needed roles via the User Configuration in the admin panel.
***